
Showing posts with label DT GuestDesigner. Show all posts
Showing posts with label DT GuestDesigner. Show all posts
Steph | Guest Designer
Hi everyone, have you seen the stencils available at from RebeccaBaer.com? I recently received this amazing Urban Jungle Stencil (Small | ST-614) and couldn't wait to work with it. I love the fun design and the many different ways you can use it.
Using white cardstock and art daubers, I added assorted colors of ColorBox inks. These inks blend wonderfully and look amazing together so I used 4 different colors from the Gypsy 6 color inkpad.
I also inked around the edges with two colors before matting the piece on black cardstock. A purple card was perfect to showcase the stenciled piece.
I added flowers to the left edge and placed a Makin's Clay leaf behind the flowers. The clay element added just the right touch of dimension. Cheers was added amongst the flowers and an owl was seated on top. The panel was then added to the card with foam adhesives for dimension.
Add just because, I added a green clip to the side of the card and hung a charm.
What do you think?
Steph Ackerman | Guest Designer
Ewelina | Guest Designer

Today, I want to share with you page I made as a DT member for The Studio Challenges blog. The new challenge has a HERO theme so as long as you focus your work around a hero of yours, you're in.
I decided to give a little twist and focused on a group of people rather than one person - MOTHERS; what a great timing with Mother's Day just around the corner. Every mother is a hero in its own right...so why not give them the recognition they deserve?

I wanted to make the page fresh and bright so I used green and yellow Brusho powders; I overlaid them with stamp inks and the Harlequin Damask | Small stencil from Rebecca Baer as well as a negative of the title, which I designed and cut out on my Silhouette Portrait. Texture paste and sprinkles of mists from 13arts added even more layers to the background. To finish, I mounted the photo on a scrap of green card, added the title and decorated with some Prima flowers.
Here are some close-ups of the layout.


Katie | Guest Designer
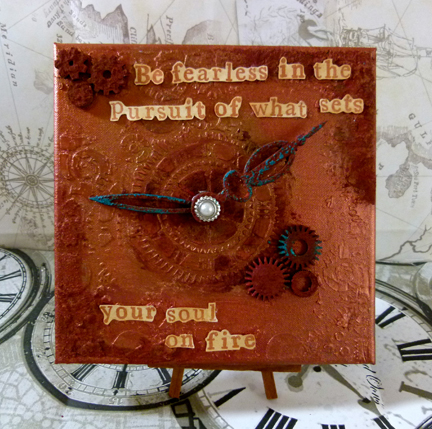
Hi all, I am guest designer over on the Rebecca Baer blog today and I am sharing a canvas I made using the Steampunk Clockface Stencil (ST-613). I love these because there are so many parts of the stencil that can be used to create unique backgrounds.
I took a 7x7 inch blank canvas and using thick texture paste I created a textured boarder using the flourish along the side of the stencil. I dried it with a heat tool to prevent smudging.
Next I took the clock in the center of the stencil and applied it to the center of the canvas. I dried it off and then applied another layer of texture paste to make it stand out.
I then painted the whole thing in bronze and copper paint and then did an undercoat of red shimmer paint over the clock before painting it copper.
I then mixed brown and orange acrylic paint together to create a rust color, which i added cinnamon powder over while it was wet to create texture. I then dabbed over the top with more paint to seal it and left to dry.
I used some of the paint mixture on the clock face which I dabbed on with my finger to give the fine details an even covering of rust.

The quote was made using an alphabet stamp set and smooth card. I cut out the words and spritzed them with Sepia Ink before adhering to the canvas.

Katie Lamb | Guest Designer
Subscribe to:
Posts (Atom)


